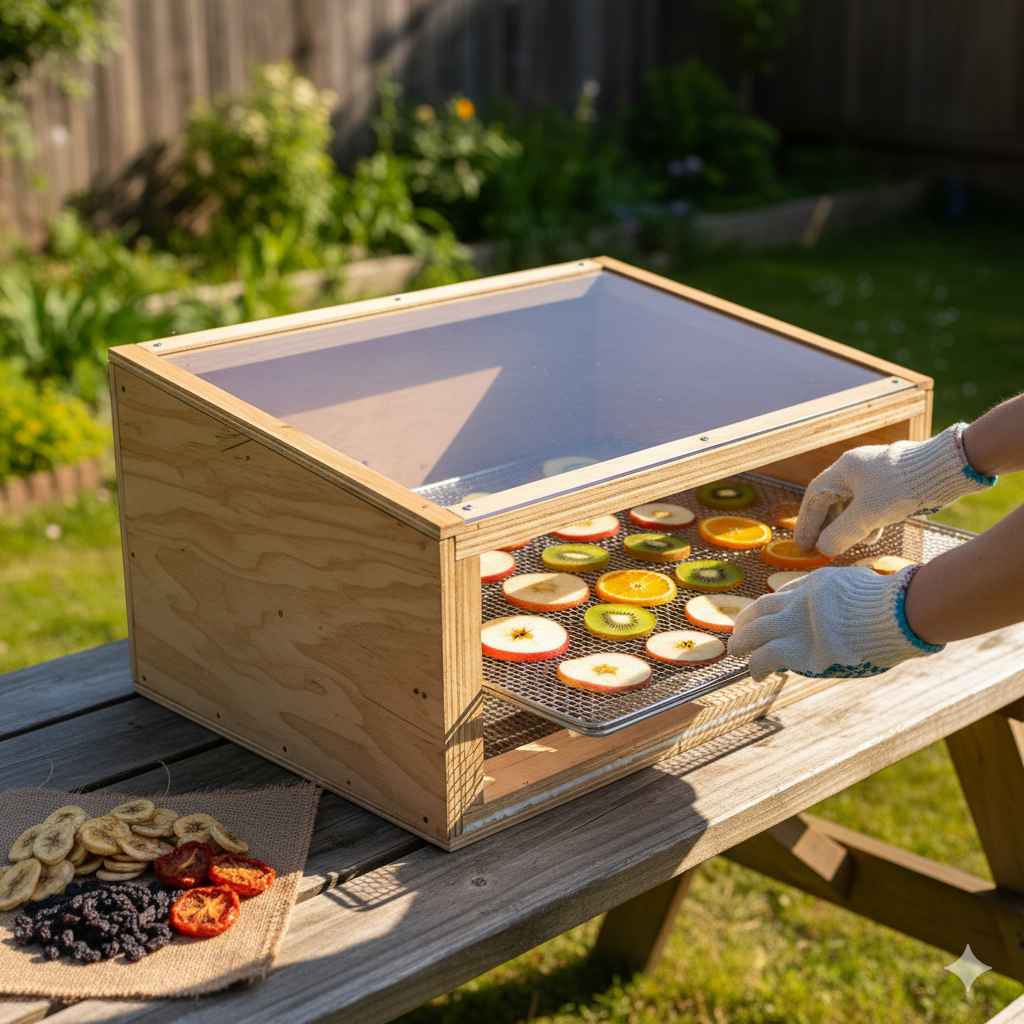
DIY Solar Food Dehydrator: Preserve Your Harvest with the Sun
Got an abundant garden harvest? Or just looking for a truly frugal and eco-friendly way to preserve food without electricity? This Frugal Footprint DIY guide will show you how to build an efficient passive solar food dehydrator from common, often reclaimed, materials. Dry fruits, vegetables, and herbs naturally, lock in nutrients, and extend your pantry staples – all powered by the sun!
Project Overview
Difficulty: Intermediate (requires basic carpentry/assembly skills)
Estimated Cost: $50 - $150 (can be lower with more reclaimed materials like old windows, scrap wood)
Time Commitment: 1-2 Days (assembly), plus ongoing use for preservation.
Why Do This Project?
Electricity-Free Preservation: Preserve food using only the sun's energy, saving on utility bills.
Reduce Food Waste: Save your garden bounty or bulk purchases from spoiling.
Healthy Snacks: Create nutritious, preservative-free dried fruits and vegetables.
Boost Self-Sufficiency: A core skill for off-grid living and food independence.
Learn Solar Thermal: Understand how to harness the sun's heat.
Eco-Friendly: Zero emissions, zero fossil fuels.
Materials List
(Look for reclaimed materials first! Affiliate links will be integrated on your site.)
For the Main Box/Frame:
Reclaimed Plywood or OSB: (e.g., 1/2" or 3/4" thick) for back, sides, and base.
Dimensional Lumber: (e.g., 2x2s or 1x2s) for internal framing and tray supports.
Alternative: A large, sturdy cardboard box (for a very low-cost, temporary version).
For the Solar Collector (Heat Trap):
Clear Polycarbonate Sheet or Old Window Pane: For the top/front glazing.
Black Paint (Non-Toxic, High Temp): For the interior heat absorption surface.
Heavy-Duty Aluminum Foil or Black Sheet Metal (Optional): For interior lining.
For Drying Trays:
Food-Grade Stainless Steel Screen Mesh: Or fiberglass window screen (avoid galvanized steel or anything that could rust/leach).
Small Wood Strips: For building tray frames.
Ventilation:
Screen Mesh (fine): For covering air intake and exhaust vents (to keep insects out).
Hardware:
Wood Screws/Nails: For assembly.
Hinges & Latch: For the access door.
Caulk/Sealant: (Food-Safe if near trays) For sealing joints and glazing.
Wood Glue.
Monitoring (Highly Recommended):
Digital Oven Thermometer or Dehydrator Thermometer: To monitor internal temperature.
Optional: Humidity gauge.
Tools List
Circular Saw or Hand Saw: For cutting wood.
Drill: For pilot holes and screws.
Measuring Tape & Pencil.
Square.
Staple Gun: For attaching screens.
Paint Brush/Roller.
Caulking Gun.
Safety Glasses & Gloves.
Step-by-Step Instructions: Building a Box-Style Dehydrator
Phase 1: Collector Box (The Heat Trap)
Cut Collector Sides: Cut 2 pieces of wood for the short sides (bottom and top) and 2 for the long sides of your collector box. The bottom will be a rectangle, the top will be angled. The collector should be about 4-6 inches deep at the bottom, tapering to 1-2 inches at the top for efficiency.
Cut Back & Base: Cut a piece of plywood for the back of the collector and another for the base.
Assemble Collector Box: Join all cut pieces to form the collector box. The back should be taller than the front to create an efficient angle for the glazing. Secure with screws and wood glue.
Paint Interior Black: Paint the entire interior surface of the collector box with non-toxic, high-temperature black paint. This is crucial for heat absorption. Let dry completely.
Install Glazing: Attach your clear polycarbonate sheet or old window pane to the angled top/front opening of the collector box. Secure with screws (pre-drill pilot holes for polycarbonate) or retaining strips. Seal all edges with silicone caulk to create an airtight seal.
Phase 2: Drying Chamber (The Tower)
Cut Drying Chamber Sides: Cut 4 pieces of plywood for the sides of your drying chamber. This chamber will sit directly on top of the collector box. The front of this chamber will serve as your access door.
Assemble Chamber: Assemble the three fixed sides (back and two fixed sides) with screws and glue, forming an open-front box.
Create Tray Supports: Along the inside of the two fixed sides of the drying chamber, install small wood strips (e.g., 1x1s or 1x2s) as ledges for your drying trays. Space them 3-6 inches apart, ensuring good airflow.
Build Drying Trays: Construct frames for your drying trays using small wood strips. Staple the food-grade screen mesh securely to these frames. Ensure they fit snugly on the ledges you created. (You'll likely need 3-5 trays).
Access Door: Cut a piece of plywood for the front door. Attach it to one side of the drying chamber with hinges. Install a latch to keep it securely closed.
Phase 3: Integration & Ventilation
Connect Collector to Chamber: Securely attach the assembled drying chamber on top of the collector box. Ensure a tight seal between the two sections using caulk or weather stripping.
Create Air Intake: Cut an opening (e.g., 3-4 inches wide, 12-18 inches long) at the bottom front of the collector box. Cover this opening with fine screen mesh to keep insects out. This is where cool, fresh air enters.
Create Air Exhaust: Cut an opening (e.g., 3-4 inches wide, 12-18 inches long) at the top rear of the drying chamber. Cover this opening with fine screen mesh. This is where moist, hot air exits.
💡 Tip: The natural convection (hot air rising) will draw cool air in through the bottom, across the solar collector, up through the food trays, and out the top vent.
Install Thermometer: Drill a small hole in one of the drying chamber sides (near the middle) and install your thermometer so the probe extends into the chamber without touching trays.
Phase 4: Testing & First Use
Pre-Heat: Place the empty dehydrator in direct sunlight for an hour or two to allow it to heat up. Check the internal temperature. Ideal drying temperatures are generally 100-140°F (38-60°C).
Prepare Food: Wash, peel (if necessary), and thinly slice your chosen food (e.g., apples, bananas, tomatoes). Uniform slices are key for even drying.
Load Trays: Arrange food on the drying trays in a single layer, ensuring good airflow around each piece.
Dehydrate: Place loaded trays in the dehydrator, close the door, and position it in full sun. Rotate trays periodically for even drying. Monitor the temperature.
Store: Once completely dry (leathery for fruits, brittle for veggies), allow food to cool, then store in airtight containers.
Safety First!
Tool Safety: Always use power tools according to manufacturer instructions and wear appropriate safety gear (glasses, gloves).
Food Safety: Ensure all surfaces coming into contact with food (screens, trays) are food-grade and clean. Properly dry food to prevent mold and bacterial growth.
Heat: Solar dehydrators can get very hot. Use caution when opening, and keep away from flammable materials.
Troubleshooting Tips
Cooker Not Hot Enough:
Too Slow/Food Molding: Ensure maximum sun exposure, proper air circulation (vents clear), and that your food is sliced thinly and uniformly. Internal temperature too low? Angle the dehydrator for more direct sun.
Food Molding: Not enough heat or airflow, or food slices are too thick. Ensure proper drying temperature and good ventilation. Discard molded food.
Pest Invasion: Check screen covers on vents for gaps. Ensure the door latches securely.
Expansion Ideas
Add a small 12V solar-powered fan to boost airflow on cloudy days or to speed up drying.
Build a larger dehydrator for bigger harvests.
Experiment with different designs (e.g., horizontal flow with a separate collector).
Integrate a humidity sensor for more precise monitoring.
Host a community solar dehydrating workshop!