Build & Test a "Frugal Footprint" Solar Cooker (e.g., Box or Panel Cooker)
Now for the step-by-step Construction Guidelines for your DIY Multi-Purpose Box (Solar Box Cooker Phase).
This guide assumes you have basic woodworking tools (saws, drills, measuring tape, squares, clamps) and a safe workspace.
DIY Solar Box Cooker: Construction Guidelines (Phase 1)
Goal: Build a sturdy, well-insulated, reflective box with a clear, double-paned lid for solar cooking.
Overall Box Dimensions (Internal Cooking Chamber Target): 24-30 inches (60-75 cm) on each side (Length x Width x Height). Adjust as necessary based on your salvaged materials.
Step 0: Source and Prepare Materials (The Frugal Footprint Imperative)
Lumber: Clean, de-nail, and cut reclaimed lumber (2x4s, 2x2s, or similar) to the lengths needed for your box frame.
Plywood/OSB: Cut salvaged pieces for inner and outer sheathing, bottom, and door.
Insulation (CRITICAL): Acquire rigid foam insulation board (XPS or EPS, 2-4 inches thick). Do NOT use craft foam board. Cut pieces to fit your box dimensions.
Glazing (CRITICAL): Obtain two panes of glass (preferably 1/8" thick) or rigid polycarbonate (1/8" thick) cut to the exact size of your lid opening. Do NOT use thin, flexible plastic sheets.
Reflective Liner: Mylar film or heavy-duty aluminum foil.
Hardware: Hinges, latch, lid prop, screws, nails. (Scavenge first!)
Sealants: High-temperature silicone caulk (for glazing) and general outdoor sealant (for exterior joints).
Paint: Dark, exterior-grade paint (e.g., black) for the outer box (optional but helpful).
I. Construct the Inner Box / Cooking Chamber
Cut Inner Panels: Cut 5 pieces of thin plywood/OSB/hardboard for the interior: 1 bottom, 2 sides (length), 2 ends (width). These will form your internal chamber dimensions.
Apply Reflective Liner: Carefully apply your Mylar or heavy-duty aluminum foil to one side of each of these 5 inner panels. Ensure it's smooth and flat, without major wrinkles. Use spray adhesive or carefully folded edges to secure it. This will be the inside of your cooker.
Assemble Inner Shell: Screw/nail these 5 reflective-lined panels together to form an open-top box. This is your internal cooking chamber. Ensure it's square. This assembly defines your internal dimensions.
II. Build the Insulated Box Frame
Cut Frame Members: Cut 2x4s or 2x2s to create a rectangular frame for the base, a frame for the top, and vertical posts to connect them. The outer dimensions of this frame should accommodate your chosen insulation thickness around the inner reflective box.
Example: If inner box is 24x24 inches and you use 2 inches of insulation on each side, your outer frame will be roughly 28x28 inches.
Assemble Main Frame: Assemble the base and top frames, then connect them with vertical posts to form the main structural frame of your box. This frame should be sturdy and square.
Integrate Inner Shell: Place your reflective-lined inner shell inside this main frame, centering it.
III. Install Insulation
Cut Insulation: Cut your rigid foam insulation board into precise pieces to fit snugly into all the gaps between your inner reflective shell and the outer wooden frame (bottom and all four sides).
Fit Snugly: Push the insulation firmly into place. It should be a tight fit to minimize air gaps. Use small dabs of construction adhesive if needed, but a tight fit is often enough.
IV. Apply Exterior Sheathing
Cut Exterior Panels: Cut 5 pieces of plywood/OSB/reclaimed wood for the exterior: 1 bottom, 2 sides, 2 ends.
Attach Exterior: Screw/nail these panels to the outside of your main wooden frame, enclosing the insulation and inner box.
Optional: Paint Exterior: If desired, paint the exterior of the box (especially the bottom and sides) a dark, heat-absorbing color like matte black. This helps absorb ambient radiant heat.
V. Construct and Install the Access Door
Cut Door Components: Cut a piece of plywood/OSB for the door face. Create a simple frame for the door, and cut insulation and reflective liner for its interior.
Assemble Door: Install insulation and reflective liner into the door frame.
Attach Hinges: Install your scavenged hinges on one side of the door and the corresponding side of the main box.
Install Latch: Attach a latch to the door and box to ensure a tight, secure seal when closed.
Weatherstrip Door: Apply adhesive foam weather stripping around the perimeter of the door opening (on the box frame) to create an airtight seal when the door is closed.
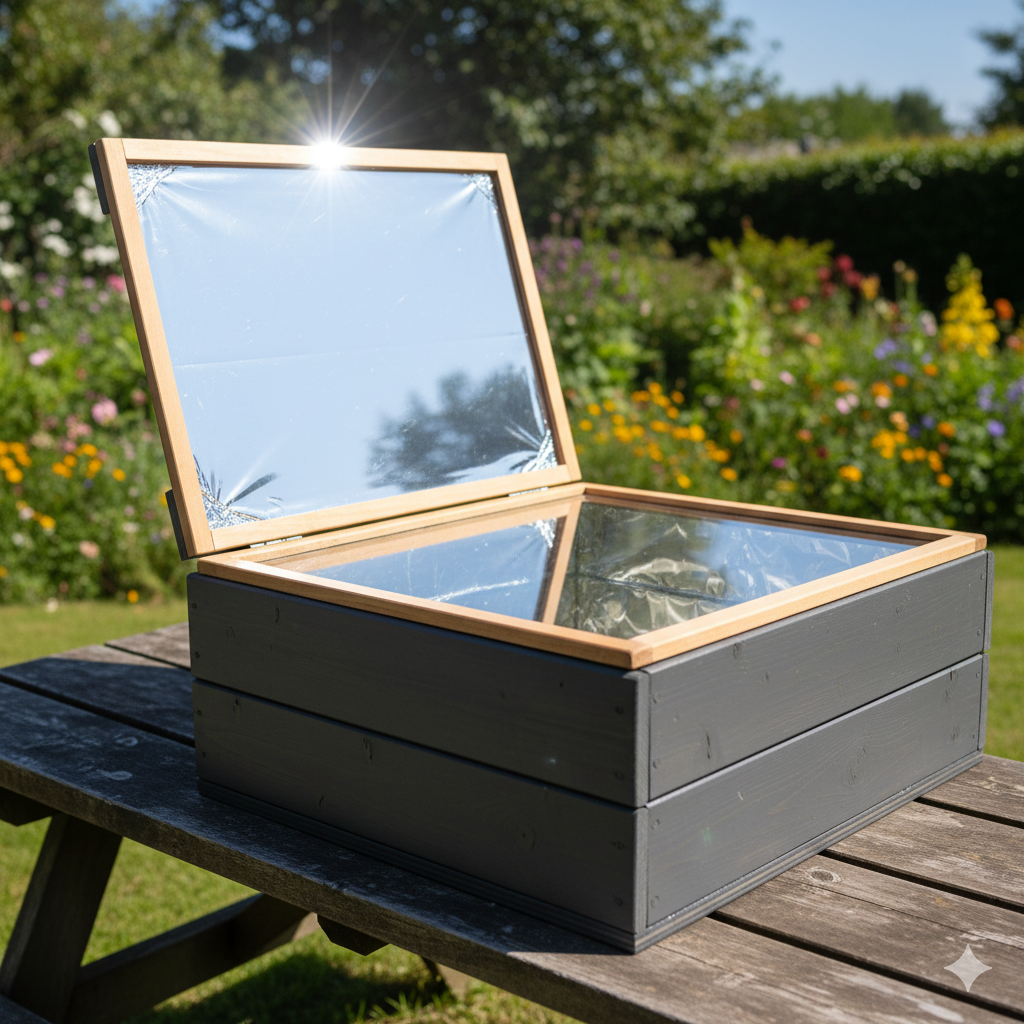
VI. Build and Install the Glazed Lid (CRITICAL)
Cut Lid Frame Members: Construct a robust wooden frame for your lid. Its outer dimensions should match the top of your box frame.
Create Glazing Rebate/Lip: Route or dado a lip (or use small strips of wood) on the inside of the lid frame to hold the first pane of glass. Create a second lip/spacer for the second pane, ensuring about a 1/2 inch to 1 inch air gap between the two panes.
Place First Pane: Carefully set the bottom pane of glass/polycarbonate into the lower lip of the lid frame.
Seal First Pane (High-Temp Caulk): Apply a bead of high-temperature silicone caulk around the edge of the first pane where it meets the frame. Let it cure slightly as per manufacturer instructions.
Place Spacers (Optional but good): For a clean air gap, you can place small, thin, non-conductive spacers (e.g., bits of foam weatherstripping, thin wood strips) around the edges of the first pane, on top of the cured caulk.
Place Second Pane: Carefully set the top pane of glass/polycarbonate onto the spacers/frame.
Seal Second Pane (High-Temp Caulk): Apply another bead of high-temperature silicone caulk around the edge of the second pane where it meets the frame. Ensure both panes are sealed to create an airtight unit. Let cure fully.
Attach Lid Hinges: Install hinges on one side of the lid and the corresponding top edge of the box.
Install Lid Prop: Attach an adjustable lid prop or a sturdy stick to hold the lid open at various angles for sun tracking.
VII. (Optional but Recommended) External Reflectors
Cut Panels: Cut 2-4 panels of plywood or sturdy cardboard to serve as external reflector "wings." These should be roughly the size of your lid.
Apply Reflective Liner: Cover one side of each panel with Mylar film or heavy-duty aluminum foil.
Hinge/Attach: Create simple hinges (e.g., piano hinge, heavy-duty duct tape, or salvaged strap hinges) to attach these reflectors to the sides of your box, allowing them to be angled to direct more sunlight onto your glazed lid.
VIII. Final Touches and Testing
Check All Seals: Go around the entire cooker and ensure all joints, seams, door edges, and lid edges are sealed against air leaks using caulk or weatherstripping.
Install Thermometer: Place your oven thermometer inside the cooking chamber.
First Sun Test: On a sunny day, orient your cooker towards the sun, prop open the lid, and deploy any external reflectors. Monitor the internal temperature over a few hours to ensure it heats up effectively.